Pages

Friday, August 8, 2014

DAISO HACK ~ BABY'S CHANGING PAD OR PLAYMAT

Daiso is a five ringgit store. I bought 4 pretty chair pads for 5 rm each and turned them into a baby's changing pad or a playmat. So easy ...a no-brainer and ready in minutes! And so pretty. And a money saver.

Total cost : 20 ringgit.
Finished size : 73 by 73 cm or 28 by 28 inches

Here's the tutorial...

Gather 4 chair pads, the prettier the better ~


Cut off the ties ~ careful not to make a cut in the cushion as I did...but if you do just mend by stitching the cut together ~


Machine stitch and join 2 chair pads together, pretty sides facing each other, and you will get these below...2 sets of 2 joined chair pads ~


This is the right side up ~


Align each set of 2 joined chair pads and pin them together the pretty sides facing each other..


Then stitch or baste by hand  first before machine stitching to make it easier to machine stitch smoothly. This may get a little difficult when machine stitching because they are quite puffy but you can guide and make the machine stitching reasonably straight by holding firmly at the top and bottom as you stitch. This will keep the pads from sliding off the machine. This is the hardest part. But once you're done you're DONE!


DONE...4 chair pads joined into a square ~ so pretty and quick ~


Thursday, July 3, 2014

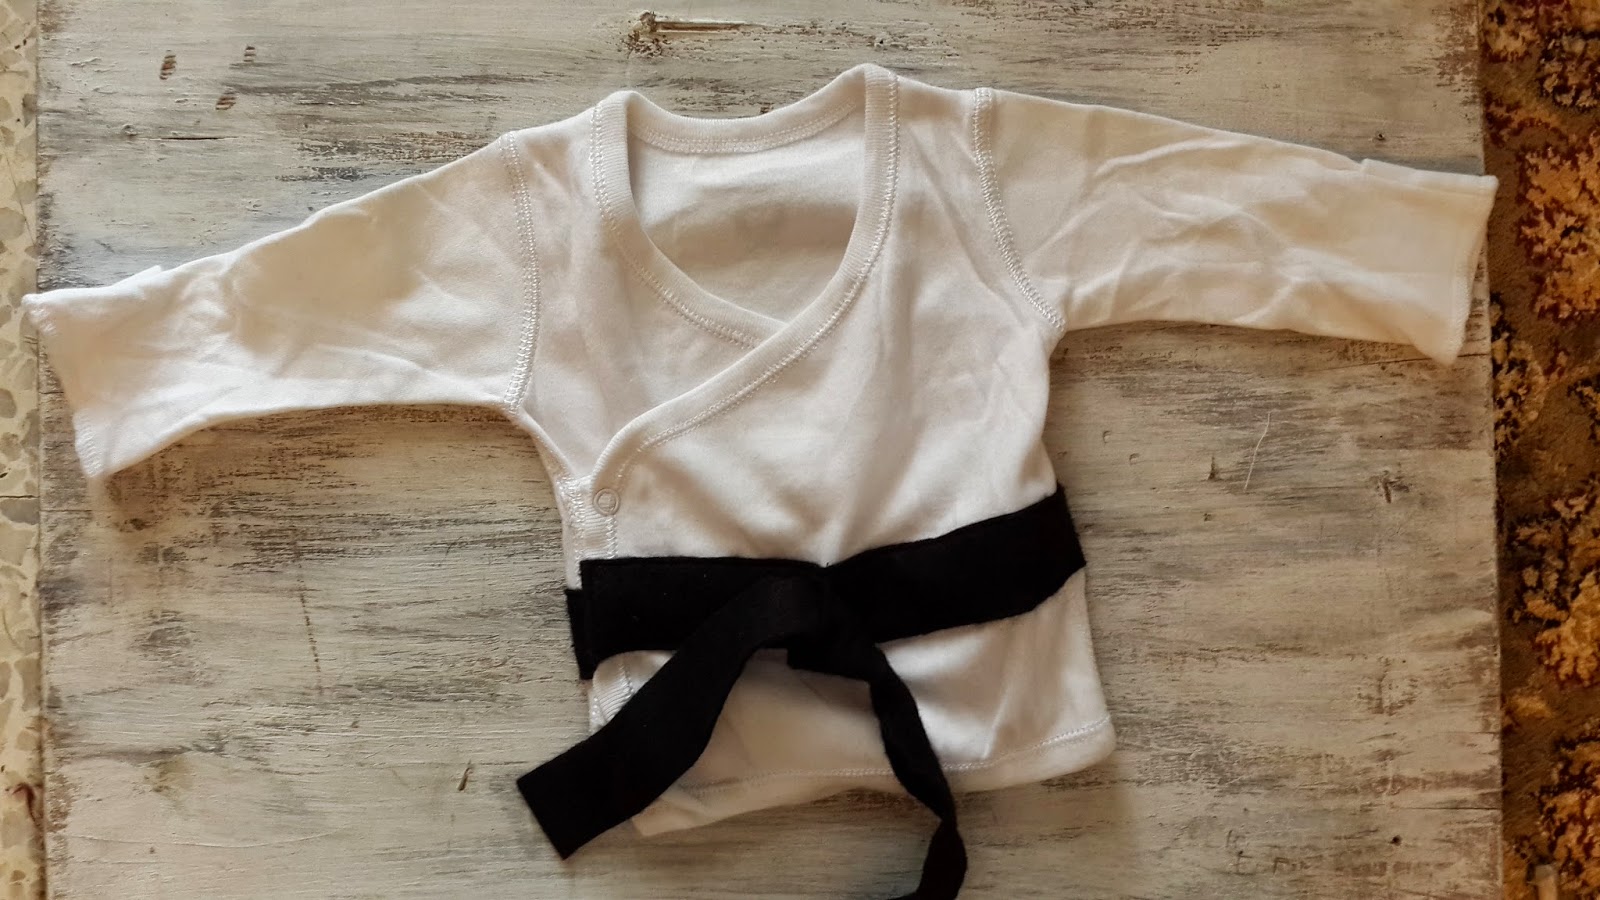
TUTORIAL FOR A KARATE BLACK BELT ON BABY SHIRT


For the karate obsessed!

A new grandson is on the way. This is what I stitched as requested by the father for his brand new son.

Equipment :

Buy a newborn wrap over baby shirt
A piece of black felt 16 inch square
Black thread
White tailors chalk for marking
Pins
Sewing machine


Method :

Measure and cut a long piece of the black felt according to desired width (about 11/4 inches). The length for the 'belt' should be long enough to go right around the shirt starting from the left edge of the shirt front to the right edge of the shirt back in one long continuous piece. In this case it was 16 inches long.

Measure and cut a second strip of the same width but slightly shorter in length (maybe 2-3 inches shorter) but long enough for you to tie into a knot with the ends hanging down by about 3inches.


You would now want to make a mark for the centre of the front part of the belt :

Place the shirt flat on a table. Take and place the longer (16 inch) strip across the front and around the back of the shirt. Then draw a line down the centre front  part of the belt using a white tailors chalk.

As you can see in the photo below, I used a mock baby shirt for clearer demonstration. I wrapped the belt right around the 'shirt'. I then drew a white line along its centre front.


Now, taking the shorter strip measure and mark its centre with a white chalk as well. You then place the shorter strip on top of the longer strip making sure the white lines of both strips coincide.

I pulled the ends of the shorter strip downwards so you could see that there are two separate strips in the photo, one being on top of the other. 

Machine stitch on that mark downwards so that the shorter strip lies on top and becomes attached to the longer strip underneath.


Once you have stitched the shorter strip over the longer strip you can now prepare to stitch the whole longer (underneath) strip to the shirt itself.

First, holding the longer strip place it on the shirt and starting from the left front edge of the shirt pin it into position and go on pinning at intervals right around to the right edge of the back, the whole belt being positioned slightly below the waistline of the shirt.

You may hand stitch long running stitches after you have pinned if you are new to sewing, to avoid dealing with pins while machine stitching, but I did not find it necessary.

Once the belt has been pinned or hand stitched into place you can now machine stitch the belt keeping the stitches close to the edges of the belt, all the way around the shirt, from front to back, along the short edge and round again from back to front and finishing along the second short edge. Double stitch a little at start and finish. It's done.

You can now tie the short strip into a knot and it's ready to be gifted.


This is the actual completed piece.

Friday, April 4, 2014

Easy DIY Fabric Bags

These fabric bags are easy to make in various sizes.

Good and clear photo tutorials by Rashida Coleman-Hale

http://www.petitepurls.com/Fall2010/fall2010_s_lunchmoney.html


Quick Pipe Cleaner Finger Puppets

These are too cute to ignore! Make them with your kids! Easy n cheap

Credit goes to : Darlene's Crafty Crew
 http://littlepageturners.blogspot.com.au/2010/03/pipe-cleaner-bunnies.html

Colourful pipe cleaners like these can be bought at art & craft stores in KL/ Malaysia


Sunday, March 30, 2014

Tissue Paper Flowers

This a great link on how to make tissue paper flowers......Have fun....And thank you to Nellie Bellie blog !


xoxo

zurina

Thursday, March 27, 2014

Shop Till You Drop

Today I went shopping with my mother....I hereby declare and swear to God that we are both craaaaayzeeeeeeey...

From 10.30 am to 6 pm...from Pasar Taman Tun to the end of one road....and my mother is 86 years old! Still standing, talking, shopping and dressing ok. Wahduuuuh! We went wild like no other wild people....we got tricked into buying more and more and more....with our consent of course. Have you ever felt like that? Like wanting to be tricked into buying yet feeling like you're tricked into buying...Yepp...that's how stupid-clever we felt.

Now we have so many important decisions to make. Like ...shall we sleep or belek-belek (touch-touch)? Sigh...verrrrry difficult.

You all know what i mean right? I mean ...You all ladies ...women...girls.....females..pompuan...anyone and everyone who looks anything remotely like us.

High five! Fist ~  yea ~

xoxo

zurina

PS..Next time we will take a pic of our mad eyes ...hehe

Check out LOLA ROSE'S treasures on facebook kay!

https://www.facebook.com/pages/Lola-Rose/719209288119046?ref=hl

Wednesday, March 26, 2014

My Wedding Crafts

A little more than a year ago our eldest son Nik married his sweetheart Jun.


Perfecto!. A good and wonderful reason to create, craft and go a little bit crazy.

I sewed linen and lace favour bags, made the fabric roses in vintage blue.


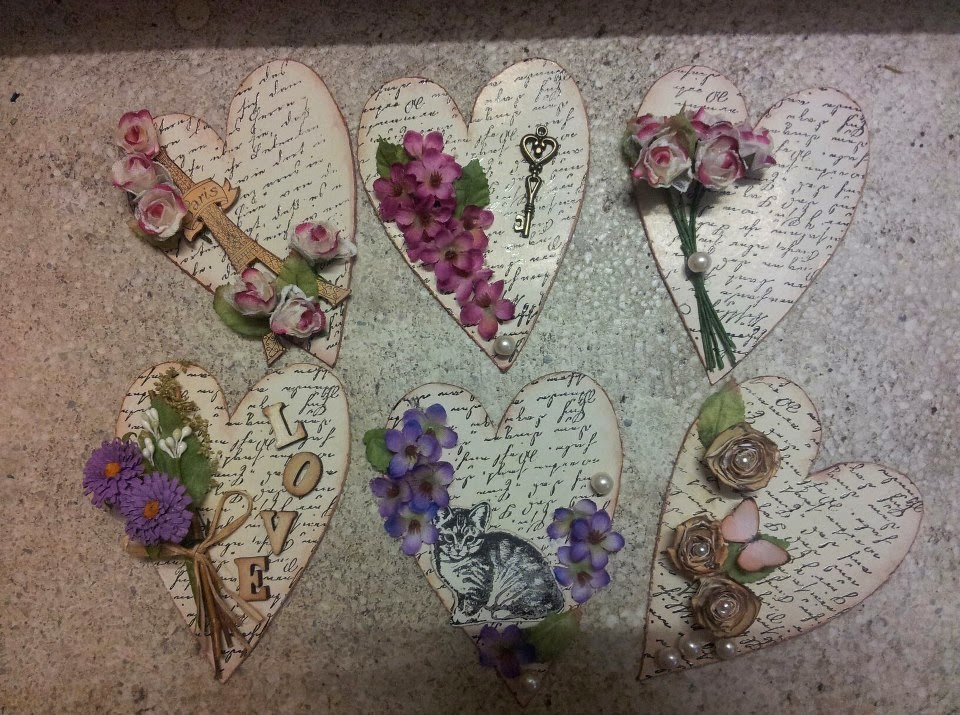
I made Hataran Cards for each hantaran tray. They have become momentos for Nik and Jun to cherish long after the hantaran gifts have been devoured. Attach a ribbon or magnet to the top or back of each and viola!...a reminder of your wedding day at your disposal to hang or stick anywhere you please.

Kad2 'heart' yang saya kraf .....untuk di letak di setiap dulang hantaran.........dalam gambar di bawah perkataan seperti 'respect'...'honour'...'love' dan sebagainya belum di letak lagi ketika gambar ini di ambil ...


I made the guest book..


And.vintage inspired paper cones for seaweed crackers that I had made too...


I made ...I made ...I made.....crazeeeeee me !!!

I made all the cakes for the dessert table and of course the 2 tiered vintage inspired wedding cake as well.


I had the pelamin arranged the the way i imagined it to be...so happy with it..


I honestly think weddings were invented  just for me.

xoxo

zurina

Check out Lola Rose's facebook page...so many treasures for sale ~
https://www.facebook.com/pages/Lola-Rose/719209288119046

Tuesday, March 25, 2014

Who, what or why is Lola Rose ~

Once upon a time not very long ago in the land of Nothing-To-Do, where sat the little town of Desperation, it rained for forty days and forty nights.

After forty days and forty nights the sun came out. It dried up all the rain and wild flowers began to grow. They grew all over the hills and valleys of Nothing-To-Do. Across miles and miles of fresh, new grass, as far as the eyes could see, colourful petals billowed in the soft, cool breeze. These gorgeous flowers and their sweetest scent bloomed, floated and swirled throughout the land and it reached the little town of Desperation. It made all beings senseless.

In my senseless state, in Desperation, I bent over, reached out and picked the one that was the loveliest. I named it Lola Rose.

xoxo

Zurina

Check ou Lola Rose's facebook page where treasures are to be found !
https://www.facebook.com/pages/Lola-Rose/719209288119046